Saturday, October 17, 2015

Avocado Chapathis with Soya Nugget Curry

These chapathis are super easy to make and need the fewest of ingredients. There is one caveat though - use all the dough at one go. Otherwise the avocados will oxidize. However the chapathis can be stored up to a day.
The soya nugget curry is a great accompaniment to these. Spicy, succulent and finger-licking good!


For the chapathis, you will need -

Atta (Flour) - 2 Cups approx.
Avocado - 1
Cumin Powder - 1 tsp.
Chilli Powder - 1 tsp.
Turmeric Powder - 1 tsp.
Salt - 1 tsp.
Water - About 1/2 a cup (depends on the flour )
Oil - 1 tbsp.


Method -
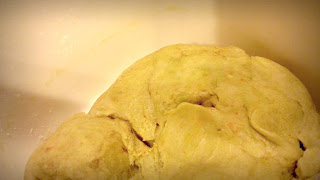
Mix all the ingredients except water and oil. This should form a semi-dough. Now add water little by little till you get a soft dough. Finally add the oil and incorporate it nicely into the dough by kneading it well. The dough will be very soft and such a treat to handle. The buttery texture of the avocados gives the dough a loving personality :)


Now make balls the size of your fist approximately and roll the out. You will have to use some flour for dusting. I tried making perfect circles but did not really succeed!


Cook it on a flat griddle, on both sides.

For the curry, you will need -

Soya Nuggets - 1/2 Cup
Red Onion - 1/2 finely chopped
Ginger - Garlic Paste - 1 tsp.
Green Chilies - 1 fine chopped
Tomato - 1 fine chopped
Mustard Seeds - 1 tsp.
Curry Leaves - 4
Salt as per your liking
Turmeric Powder - 1/2 tsp.
Cumin Powder - 1 tsp.
Sambhar Powder - 1 tbspn.
Coriander Leaves - A Handful, finely chopped
Oil - 1 tbspn.
Water - 2 Cups

Method -

Boil the water with a pinch of salt and as it begins to boil, put in the nuggets. Allow to boil for 4-5 minutes. Then turn off the heat and close the lid on the vessel for another 5 minutes. Then thoroughly wash the nuggets in cold water. This will take away the raw smell of the nuggets.
Heat oil in a wide bottom vessel. Add mustard seeds and wait for it to crackle. Then add curry leaves, onions. Sauté for a minute or two and add chilies, ginger-garlic paste, salt and turmeric. Sauté for 3-4 minutes. Now add tomatoes, cumin and sambhar powder.

Note - If you don't have sambhar powder, add one teaspoon each of coriander, pepper and garam masala powders.

Sauté really well till the oil frees itself from the gravy. Now add the nuggets and half a cup of hot water. Let it simmer for 10 minutes. Garnish with coriander leaves.


Saturday, April 25, 2015

Chocolate Swiss Roll

Here's a wonderful secret I am letting you in on. This absolutely sinful dessert has no flour and no butter. Yes, you read that right! I was shocked too when I read the recipe but it is true and it is one of the best looking and definitely best tasting desserts I have ever made. Without further ado, I present to you, the exquisite chocolate swiss roll.


For this you will need -

15in by 10in Sheet Pan
6 - Eggs
120 gms - Baking Chocolate (semi sweet)
50 gms - Sugar
1 1/2 tspn - Vanilla Extract
1/8 tspn - Salt
250 ml - Heavy Whipping Cream
2 tblspns - Sugar
6-8 - Fresh Strawberries (blended), if planning to finish the Swiss roll the same day, else use
2- 3 tblspns - Strawberry Preserve

Method -

Prepare the sheet pan by lining with parchment paper and then applying butter on top.

Separate the yolks and the whites when the eggs are cold. Wait for thirty minutes to let them come to room temperature.


Ensure that your mixing bowl is dry and free of any dirt. Put the whites and start beating till it begins to froth. Now add the salt, just a pinch and keep beating till you get soft peaks. Since my mixer has only one bowl I put the beaten egg white in a different container, if you have two bowls, then leave the egg whites in the bowl you mixed.


Now, take the yellows and beat till you get beautiful ribbons when you lift with a spatula. Add the sugar and keep on beating till mixed. In the meantime break the chocolate into small pieces.


Melt in microwave on high for 45 seconds or when the chocolate just melts. Do not over heat, it will ruin the texture and burn the chocolate. Alternately, heat in a double boiler that is boil water on the cooktop and put the chocolate in another bowl placing it on top of the boiling water. The steam from the water will melt the chocolate. This will take longer but will definitely not burn the chocolate.


Add this melted chocolate and vanilla extract and beat till mixed. Now fold the whites into this mixture, making sure not to over mix but be sure to mix them well. Pour this batter on the sheet pan and spread it out evenly. Bake at 180deg C for 15 minutes. It won't rise much. It shouldn't.


It will come out looking quite sad but don't be fooled by it's looks. To prepare the icing, beat the whipping cream with sugar, vanilla and strawberries (fresh or preserve) till soft and fluffy. To ensure a good icing, have all utensils and ingredients cold, straight out of the refrigerator. Spread the icing evenly on the cake after it has cooled.


Now, start to gently fold the cake from the shorter end. It is easier from this end. If you want a longer roll, then you can fold from the longer end. I have never tried that. A little bit of the cake may stick to the parchment paper, that is fine. Once rolled, use the remaining icing to spread on the outside and as much as possible underneath too.


Cut into beautiful slices and serve.


Wednesday, March 18, 2015

Rose Apple Tarts

My friend's mom is an innovative and adventurous cook. She keeps posting her delicacies on Facebook and this was one of her recent posts. They looked so divine, I had to try it. They are super easy and super quick to make. I bet you can impress anyone with these!


For this you will need -

1 Cup - All Purpose Flour
1 - Red Apple
2 Tbspn - Sugar
1 Tbspn - Honey
3 Tbspn - Water
1/2 Stick (approx. 50g) - Butter

Method -

Cut apple in half and remove core. Then slice each half into thin slices. Put these in a vessel and add the honey and water. Now cook these slices for about 3-4 minutes till just soft. Don't overcook as then they won't retain their shape at the next stage.

In a mixing bowl, add the butter, flour and sugar. Mix with a tablespoon of the apple water to form a soft dough. Refrigerate this for 15minutes.

Then, take it out and roll out to about 1 inch thickness. Once rolled, cut out strips of about 2 inches width. Take one strip, place it horizontally in front of you and then place about 4 -5 apple slices, overlapping, along its length. Try not to get any liquid. Now gently roll this to automatically form the shape of rose. Place gently in a muffin wrapper.


Continue doing the same for the rest of the slices. Bake these at 350 deg F for about 15 - 18 minutes. Once baked, glaze with honey and dust icing sugar.


Sunday, February 8, 2015

Whole Wheat And Oat Bread

Warm fresh bread with soft butter and a dash of pepper sprinkled on top is something I just can't resist! The one time I was in Paris I went crazy just looking at all he breads that the bakers would display in the morning and from that time I have wanted to make bread. I did make it once but that was before I started blogging and then for some reason or another never tried making it.
Another reason for me to make bread is that my dear husband eats bread every morning. I feel like instead of serving store bought stuff, it would be so heartening for me to bake and give him fresh home made goodness that is healthy and delicious!

So here it is. This is a really simple recipe.


For this you will need -

2 Cups - Whole Wheat Flour
1 1/2 Cups - All Purpose Flour
3/4 Tspn - Active Yeast
1 1/2 Cup - Warm Water
1/4 Tspn - Salt
1/4 Cup - Oats
Olive oil just to smear the bowl

Method -

Take warm water in a large bowl and add yeast to it. Let stand for about five minutes so the yeast begins to do what it does best, froth! Then add the salt and the flours. Take a plastic or wooden spoon and mix toll you get a wet sticky dough. Lift this dough and smear the olive oil inside the bowl. Replace the dough and cover with muslin cloth. Keep this in a warm place for about two hours. The dough should rise and double in size approximately. Don't panic if it doesn't double in size. As long as it grows a little bit it is good.
If you are making this is summer or in a tropical place, you may want to check the dough every 30 minutes, once it has risen enough you are ready for the next step.

Then roll and knead the dough with oats and more flour so as to incorporate the oats and to finally have a dough that is not sticky. Shape like a an American football, dust with flour (to retain its moisture) and let it rest for about an hour and a half.

Pre heat the oven to 425 F and then make about 3 - 4 cuts of about an inch on top of the dough. Place this on a baking sheet on a baking tray. Place the dough on the top rack and on the bottom rack place another baking pan with hot water in it. This will help the crust to be a little more soft and the bread moist too. Make sure to use a metal or iron baking pan for the water, not glass or ceramic. Bake for about 25 minutes, till golden brown on top! Serve warm with butter or jam or just plain!

This wonderful recipe that I slightly tweaked is from - http://minimalistbaker.com/easy-homemade-wheat-bread/ Great blog, do check it out!


Sunday, January 18, 2015

Kale With Coconut (Kale Thoran)

This green is tough! I had not tried cooking it till recently because I wasn't sure what I wanted to make with it. Then my parents dined at a Sri Lankan restaurant where they tried kale with coconut and they loved it. So there it was, my inspiration! A favorite specialty, of mine, from Kerala is their thoran, sort of a stir fry. So I decided to make thoran out of kale.


For this you will need

1 Bunch - Kale (I used the curly green)
1 Tablespoon - Coconut (I used frozen and thawed grated coconut)
3-4 pods - Garlic
2 Teaspoons - Red Chili Powder
1 Teaspoon - Turmeric Powder
2 Teaspoons - Cumin Seeds
Few Curry Leaves (Optional)
1/2 Red Onion - Fine Chopped
1 Teaspoon - Mustard Seeds
2-3 Teaspoons - Oil
Salt as per your taste
A pinch of sugar

Method -


Chop kale as fine as possible. In a flat bottom pan add the oil. Once hot, add the mustard seeds. When they crackle, add the chopped onions and fry till they turn light pink.


Now add the chopped kale, a pinch of sugar and salt. Toss, cover and let cook for a couple of minutes. In the meantime, blend the cumin, coconut, red chili powder, turmeric powder, garlic and curry leaves coarsely. Not a fine paste and do not add water. Once the kale is cooked, add the ground mixture, toss and serve.


Thursday, January 1, 2015

Paneer, Rasagulla and Rasmalai!

The process for making Rasmalai is quite long and along the way I will tell you how to make the famous Indian cheese, paneer and another sweet Rasagulla. Rasagulla and Rasmalai are delectable sweets from the eastern state of West Bengal in India. Bengalis have perfected the art of making light, airy balls of paneer (cheese from India) and filling every globule with sweetness! Rasmalai especially is a rich dish with few ingredients but needs some skill and practice. It has a smooth after taste that leaves you wanting for more :)


For this you will need -

4 Cups - Milk ( I used whole milk)
2 Tablespoons - White Vinegar ( mixed with 2-3 tablespoons of water)
Muslin/ Cheese cloth

1 Cup - Sugar
4 Cups - Water

1 Tin - Condensed Milk
2 Cups - Whole Milk
Nuts - Almonds and Pistachios roughly chopped (I used only almonds)
5-6 Strands - Saffron (Optional)

Method -

Bring the four cups of milk to a boil, stir occasionally to avoid burning the milk at the bottom. Once it starts to boil, add the vinegar and water mixture little by little (say in about three parts). Keep stirring and the milk fat will separate out leaving whey water behind. Some people use lemon for the same purpose but I prefer vinegar as lemon has a very strong flavor that the resulting paneer will take. It should look like this.


Use the muslin cloth to separate the paneer from the whey water. Don't throw the whey water as it is quite rich in nutrients. Use it to make curries or to cook rice in or to make the dough for rotis or drink as such with a pinch of sugar. I didn't get a picture of the paneer but basically wait for the entire water to drain out by hanging the muslin cloth for about 20 minutes and then squeezing out as much of the water as possible. You will be left with a nice soft ball of white cheese.

Now, the hard part. Knead the cheese really well for about 15 minutes. You will know it is ready when you can make smooth balls out of it. I should have kneaded a bit longer! For the quantities mentioned, you should get about 20 balls. Make small balls as they double their size when cooked. Flatten them slightly for rasmalai or leave them round for rasagulla.


Now in a thick bottom vessel, make the sugar syrup with one cup sugar and four cups of water. When the syrup comes to a boil, add the balls. Cook on medium high, do not reduce the flame. Cook for about 15-20 minutes till the balls double in size. Which means ensure you have a big enough vessel in the first place to accommodate the fully blown balls!
 

Cool and serve chilled as Rasagullas! As they cool, their size does reduce a bit, don't worry about that.


For Rasmalai, heat two more cups of milk with the saffron strands so the saffron hue spreads throughout the milk. Then add the condensed milk, you can change the quantity of condensed milk depending on your liking of sweetness and thickness. I used a whole tin! We are a sweet toothed family! After about five minutes, slightly and gently squeeze the rasagullas and put it in the milk. Add the chopped nuts and cook for about 10 minutes so the milk infuses into the cheese balls.


Serve chilled!